Update, 2018-09-01: Hi folks! I’ve gotten a lot of email and comments here, and I appreciate your enthusiasm, but this is a blog post about a table I built in my free time. Like I say in the post, I’m not a professional woodworker; I’m a hobbyist. I am also not a lumber mill. I’m a software engineer: I don’t have any tables or wood to sell. Try a local woodworker! If you’re in the San Francisco Bay Area, I can recommend Tree to Table. Cheers!
When Tyler and I rented this apartment together, we knew we wanted a table. Our common room has a linear kitchen at one end and the couch & coffee table at the other. Our plan (and in concordance with FARMHOUSE KITCHEN, DIFFERENT CHAIRS, and HALF-FILLED WALL) was to divide the two spaces with the dining table–and to get some extra counter and storage space. With tons of natural light, white walls, and blond flooring, we knew we wanted a solid, darker piece to balance the room–something with rough, warm materials. It also needed to be unusually high, to provide a standing work surface. After rejecting a few expensive and ill-sized pieces from craigslist, catalogs and furniture stores, we decided to build one ourselves.
I saw my first live-edge table freshman year at Carleton; an acquaintance had completed one as a part of their woodworking study, and invited a small group to dinner to celebrate. Oak, I believe–roughly eight feet by 40 inches, a beautiful pair of book-matched slabs cleaved perfectly from bark to core, and polished to a fine sheen. The top rest on legs only 18 inches in height; we sat on the floor or cushions. For seven years the feeling of that table resonated in my memory. Now I had the workshop and living space to make one myself.
I should mention that I’m an amateur woodworker at best. My grandpa was a fine craftsman in furniture and instruments, and my father built most of the furniture in our house, but my contact with the art is limited to helping my dad build storage lofts, beds, and the like, and small projects by myself. I have a good intuitive sense of space and color, and of force geometry; a beginner’s understanding of wood grain and technique; a few basic tools; an ample supply of patience; and a willingness to learn from books, lore, and by experiment. In many aspects of this design I chose the path which was cheaper, or accessible with limited tools, or allowed more tolerance for error. There’s a huge gap in design and execution between this table and a professional piece. And still: I wouldn’t give up the hundred-odd hours I invested for a finer piece built by someone else.
I set up an old IKEA desk in the same spot for a few months to understand the dynamics of the space–how much clearance we needed in the kitchen, how high the surface needed to be, how we walked around it to get to cupboards and the fridge. From this I knew our table would be roughly six by three feet, and about 40 inches in height. I sketched some initial plans in Blender to get a feel for aspect ratios and how the joins would reinforce each other under load and torsion.

Then I got fired, and spent a lot of time handling interviews and job offers–followed by a full-time contract on Riemann. When I finished the release a week before Thanksgiving, I realized that the month I’d planned on having was now only eight days–and decided that goshdarnit, I was going to make this happen.
The Slab
I visited the guys over at Cal Urban Lumber, who had a perfect Bastogne walnut slab at perfect dimensions for only $1K–and it had just been sold a few days before. Another beautiful piece, but four feet by 40 inches–just not suitable for the space. I found a book-matched walnut pair which would be doable but require a more complex frame, and a pair of redwood pieces which were cheaper but didn’t have the figure I wanted. Then I got in touch with Tree to Table—and Dan said he’d found a slab in one of their warehouses that might be perfect for me.
Tyler and I arrived that night to see the slab. Just over two inches thick, Claro walnut, with a rippling fiddleback pattern throughout, and a swirling mixture of sap- and heartwood. Bark intact. Regular shape. Dried three years, and with only minor cracks and a quarter inch of cupping. It was more expensive than I could realistically afford, but too beautiful to let pass. I pulled a little extra out of savings, and we made arrangements to pick it up the following day.

Plans
 With the final slab dimensions in hand, I fixed the plans. I had never been happy with the two-by-four half-lap joins I’d planned (should they face in? Out?), and worried they wouldn’t provide sufficient stability under racking. That night Tyler and I decided to go for an all four-by-four frame, which resisted torsion stresses at the joints. Tyler wanted more space for pots and pans below, so I brought the spans to the edges and introduced spreaders and slats inside. That lowered the center of gravity, so I could narrow the frame slightly and bring the edge further over each knee.
I measured the exact tolerances for comfortable foot height, for 27" seats, for work surfaces, for knee clearance. Posts were arranged to give six people the perfect balance of table space. Stools tuck underneath at the ends, where clearance is tightest.
I spent a long time tuning the visual rhythm. Since this table is 39" high, it was challenging to keep it feeling grounded. The slab edges mirror the negative space between shelf slats. The angle of the bark is echoed in a 22.5-degree mitre at the frame’s upper spreaders–balanced by the diagonal symmetries of the lag bolts. Where distances are divided, they preserve the same ratios in small multiples. I reworked the geometry by inches here and there as the project progressed–but at the end of the night, we had our first set of plans.
Planing the slab
 When wood dries, it can warp or cup to one side, depending on how the growth rings curve relative to the cut edges. This particular slab had been through a planer before drying, but had cupped almost a quarter inch at each edge. The first phase of construction was to level it.
I debated between a hand plane and a belt sander–both can be had for roughly $60 at the low end and can remove a fair amount of material. Ultimately, I decided the belt sander would be more useful for other projects, and spent fourteen hours sanding down the curves. When removing material in bulk, one typically sands at +45 and then -45 degrees to the grain, to remove the most material. As you start getting down to the final thickness, sand with the grain to do minimal damage to its fibers.
Intermittently at first, and more regularly as the surface flattened, I checked the curvature with a metal rod and straightedge–working back and forth across the plane at 0, 90, and then +/- 45 degrees. Trying to rotate the edge while pressing down will reveal high spots. Sand in continuous, smooth motions around the point you’re reducing–it’s critical to blend the depths evenly.
During this process I coated the entire garage in dust–about three cubic feet, when vacuumed. Wear a respirator. Wear earplugs. Change your clothes at the door. :)
Finishing the slab
It usually helps to work on the least noticeable side of the finished work first. I did the underside quickly and focused only on the parts which would be in contact with the frame; some curvature in the exposed pieces would be OK. Finishing the underside with the belt sander was quicker–but left belt-marks in the surface which required repeated re-sanding to reduce.
On the upper side, I enlisted Tyler’s help in hand-sanding the entire piece, with the grain, with 80, 120, 180, and finally 220 grit. Each stage of sanding reveals imperfections and scratches from previous passes, so it’s a good idea to keep that 80-grit block around. The hand-sanding process preserves the intricate waves and whorls through the grain, and reduces accidental oversanding:


I cleaned the slab with a vacuum and wiped with mineral spirits to remove the dust. The rich color and figure of the wood started to emerge. After twenty hours of moving back and forth over a dusty brown plain, I got really excited.
After an hour of drying, we brought the slab upstairs to finish it. I applied two coats of Rubio Monocoat 2C, a linseed oil with synthetic additives. It’s fast-drying, penetrative, hydrophobic, VOC-free and leaves the wood texture exposed to the touch. It’s not as durable as a polyurethane or most varnishes, but I hate the plasticky feel of poly, and getting an even surface is more difficult.

The monocoat paints on wet and chemically bonds with the wood. Then, after 10 minutes, the surface excess is wiped away. It’s usually only applied in a single coat (it is, after all, a penetrating finish), but Celia at Tree to Table suggested that her finishers typically applied a second coat with a wet, very light scuff. I used a 400-grit finishing pad for the second coat.
The transition during that first coat of finish is my favorite part of woodworking. The finish makes the surface smoother and transmits light deeper into the wood grain, which reduces surface scattering. You’re seeing into the wood; revealing deeper colors and the contrast within the figure. I remember that dusty, rough-hewn slab in the warehouse at night, staring at the pale shades in its surface, and trying to imagine what might lie within.
Frame cuts
 I made a few minor changes to the frame dimensions, and worked on sourcing lumber. Originally I’d planned on soft maple or ash, but wound up choosing Douglas fir in finished 4x4s. It’s about as inexpensive as wood comes, and has dried a bit so you can spot warping and cracks early. Think I shelled out about $300 for the frame lumber all told—ash or maple would have run about $11 per linear foot plus $30 for setup. May have been more for quartersawn; I didn’t ask.
With lumber in hand, I worked out my cut plan–where to make the cuts on each board to use as much good wood as possible, and jump over cracks and significantly warped parts where possible. I like to use warped pieces for short beams where alignment isn’t critical. I usually cut a sixteenth of an inch long, which gives me a little tolerance for error. Then I clamp all the pieces of the same length together and sand them to the correct height, so everything is even.
With the basic cuts in place, I made the join cuts, where for structural or space reasons, two beams overlap. Lap joints are some of the simplest and strongest types of joins, and although not as aesthetically pleasing as, say, mortise and tenon joinery, it is doable with only a circular saw, chisel, and rasp. You just set the circular saw to the depth of the lap (here, 1.75") and cut across the beam… over and over again. After 20 or 30 cuts, you’ll have something like this:


Which can be cut clean with a chisel, rasp, and liberal cursing. Since Douglas fir has wildly varying density across growth layers, it has a tendency to blow out in large splinters when sawed. Keep the densest growth layers on the sides the sawblade cuts out of: it’ll reduce fracturing. Or use a hardwood: there’s a reason fir is usually reserved for construction.
Frame assembly
With the cuts complete, I picked up a set of lag bolts (OK, technically lag screws, but we just call them bolts for some reason) and washers. Think I chose 9/16ths, at 3 and 4.5 inches depending on join depth. I also had to pick up a matching drill bit, since mine in that gauge was a few inches too short. I made a template with a spare chunk of 4x4, then used it to mark the points for screw holes at each join. Then it was a simple matter of countersinking space with a 1" bit for the washer and screwhead, and then drilling out the pilot shaft itself. This design leaves some of the bolts exposed as architectural features. I personally like the look–but you can cut biscuits to cover the holes too.


I used standard wood glue on the joints I intended to be permanent, but the legs are supposed to come apart so they’re dry joints. We used some leftover decking screws to attach the shelf supports and their slats.

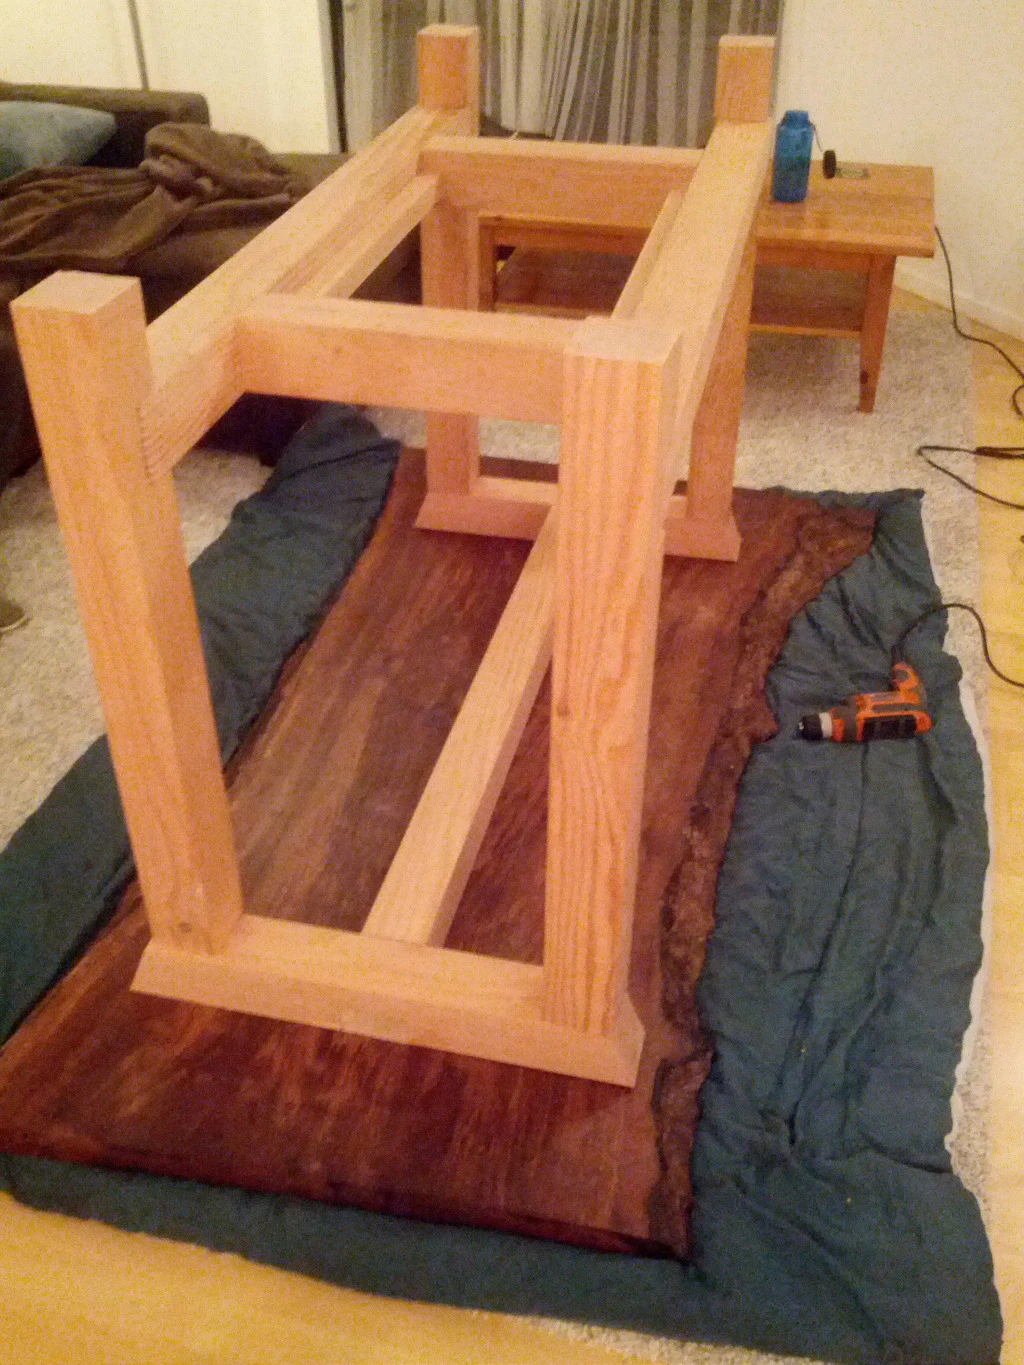
Tyler and I carried the half-assembled frame upstairs, and set it up on the upside-down table. As usual, my joins were off by a few degrees and some of the wood was warped, and it left as much as a centimeter misalignment on some of the legs. Luckily, wood is bendy. The trick is to assemble it on the slab so everything lines up correctly, and to drill and screw in the bolts in two stages. First, do one bolt at each joint (pushing the joints into alignment), and leave it loose so there’s a little play. Then, when everything is square, come back and do the second bolt. This reduces the amount that the structure will try to twist out of true.

Finishing the frame
Tyler and I sanded the frame: belt sander with 60 grit to smooth misaligned joints (one of the beams corkscrewed by 5 degrees), random orbit sander at 120 for the finish, and a final pass with ROS and by hand before finishing.
After vacuuming and wiping down with mineral spirits, we applied an aggressive wiping stain (“American Walnut”). I let it sit longer than usual and wiped it off unevenly to give the wood a distressed, almost burnt tone. I wasn’t sure about the effect initially–but it’s grown on me and looks quite good in the final piece.


Assembling the frame
All that was left was to affix the frame to the slab. We carried the frame back upstairs (oof!) and put it back on the top, upside down. We positioned six right-angle brackets and drilled pilot holes for screws.


To stabilize the cracks at one end, I used a pair of flat framing plates. Tyler beveled the corners with a Dremel, since these parts are in contact with your knees when sitting.
Finally, we flipped the frame back over, set the top in place, and screwed it to the brackets. I hadn’t planed the underside perfectly and there was a couple millimeter wobble under stress, but a small cardboard shim between the frame and top resolved that.
The finished product
It fits perfectly. The way it fills and divides the room while leaving space to work and pass by; the height of the top when chopping vegetables; the way it fits when you sit down; how the shelf is exactly where your feet fall naturally. Every aspect of the geometry is solid: I have no regrets. It’s a pleasure to use and look at.
I’m a little less satisfied with the finish. While I love the tone and texture, and it is water and stain resistant, we have a couple of plates with rough ceramic bottoms and they’ve produced noticeable scratches. I can sand and refinish individual spots since it’s not a polymer coat, but I’d say this finish does require placemats. Depending on how it wears over the next few months, I may opt to recoat it with a light varnish. Meanwhile I’ll try rubbing them with walnut meat and see how it looks; you can fill in a surprising amount of damage that way.
Bottom line: it’s a beautiful, solid piece, and despite a few errors I made during construction, I think it came off quite well. Finished just in time for Thanksgiving day–and our family loved it.


Nice work! Giving me some inspiration…